
✦ A Beginner's Guide to After Effects
Table of Contents
Specifications (Purchasing your first PC)
If you’re looking to buy a new PC for After Effects and aren’t sure what to prioritize, this guide breaks things down into three simple tiers.
Keep in mind: Each tier represents the minimum for that level of work, rather than looking at it as a single answer. Individuals may choose to spend more on certain components depending on their budget, personal priority for speed, and other uses for their computer.
Key notes:
- After Effects benefits most from RAM and CPU, with the GPU becoming more important when using third-party effects.
- After Effects prefers high clock speeds over extreme core counts.
- RAM capacity is more important than type (DDR4 vs DDR5) when on a budget. DDR5 offers a slight speed boost and is worth the purchase if budget allows.
- A PC is a big purchase. Consider consulting other editors for feedback before making a purchase; you can even visit our Discord.
Low-End / Budget-Friendly
Ideal for young editors on a tight budget — suitable for entry-level editing and smaller compositions. Users should expect slower previews and render times with more complex effects.
RAM: 16GB
Storage 512GB SSD (NVMe preferred)
CPU: Intel i5 (12th-13th gen) / AMD Ryzen 5 5600X / 7600
GPU: RTX 3050 / RX 6600 (6-8GB VRAM)
Tip: Don’t overspend on the GPU unless you also use your PC for gaming or other GPU-heavy tasks. Any extra budget is usually better spent on RAM or storage.
Mid-Range / Casual
Ideal for the casual editor — best suited for more intermediate compositions with moderate effect usage.
RAM: 32GB
Storage: 1TB SSD (NVMe preferred)
CPU: Intel i7 (13th-14th gen) or AMD Ryzen 7 5700X / 7700X
GPU: RTX 3060 / RTX 4060 / RX 6700 XT (8-12GB VRAM)
Tip: Most mid-range users see better performance gains by upgrading RAM before the GPU.
High-End / Pro
This tier is best for more complex and lengthy compositions, 4K footage, and heavy effect usage.
RAM: 64–128GB+
Storage: 2TB SSD+ (NVMe preferred)
CPU: Intel i9 (14th gen) / AMD Ryzen 9 5900X / 7900X / 7950X
GPU: RTX 4080 / 4090 / RX 7900 XT (16GB+ VRAM)
Tip: Consider whether or not more than 64GB of RAM or more than 16GB of VRAM is really needed — only massive 4K projects or complex 3D comps will use it fully.
Macintosh coming soon.
Which version of After Effects should I install?
Users are recommended to install the latest version of After Effects and take advandage of the newest features and bug fixes, assuming their system meets Adobe’s minimum requirements. If operating on a lower end device, you may have smoother performance with an older release. There's no harm in trying out more than one version before finialzing your pick or a one for all answer.
What's new: https://helpx.adobe.com/after-effects/using/whats-new.html Requirements: https://helpx.adobe.com/after-effects/system-requirements.html
Do keep in mind that After Effects projects are not backwards compatible. You won’t be able to open project files or import presets created in versions of After Effects newer than your own, only if they were made with the same or older versions. You can downgrade a project file by going to File > Save As > Save a Copy As (version), asuming you have a compatible version installed to open the project to begin with.
On MacOS? Read this to learn about Apple Silicon compatibility. Mac users have different factors to consider compared to Windows users.
What are plugins, and which should I install?
Plugins are effects which aren’t native to After Effects, meaning you download them separately. With plugins, you'll be able to use hundreds of effects that you wouldn’t have otherwise. Which plugins you should install depends on the individual, as not all plugins are used in every editing style. Hoarding plugins is also not ideal for storage or performance. Below you'll find descriptions for most “famous” plugins.
Plugin Recommendations
RSMB: short for Reel Smart Motion Blur, applies a type of motion blur to your footage
MBL: short for Magic Bullet Looks, an advanced color correction builder with plenty of tools to play with
Twitch: used to create twitch shakes, more specifically “jerky” like movements
Twixtor: famous for making “smooth” slow motion, by warping pre-existing frames together.
Universe: comes with a handful of different effects, but is most popular for VHS and some glitches.
Sapphire: contains over 100+ visual effects, such as glows, glitches, warps, etc..
BCC: short for BorisFX Complete Continuum, comes with over 100+ unique visual effects and transitions, similar to Sapphire.
Trapcode: used for creating overlays and backgrounds such as particles, swirls, and burst.
Element 3D: used to create all sorts of 3d text, models and shapes.
Saber: used to create outlines and glows that look identical to light sabers, inspired by Star Wars.
Deep Glow: provides a beautiful glow effect, which looks better than any built in glow effect, great for text and pngs.
Optical Flares: used to create all sorts of flare transitions, highly customizable.
Some great plugins for glitch editing include: Signal, Pixel Sorter, Omino, Glitchify, and Datamosh
The majority of plugin developers have videos on YouTube or their respective websites which you can watch to get a better idea and actually see what they can do before installing.
We have over 100+ plugins on our website!
Composition Settings
How to properly set up your first project file.
Resolution VS Ratio
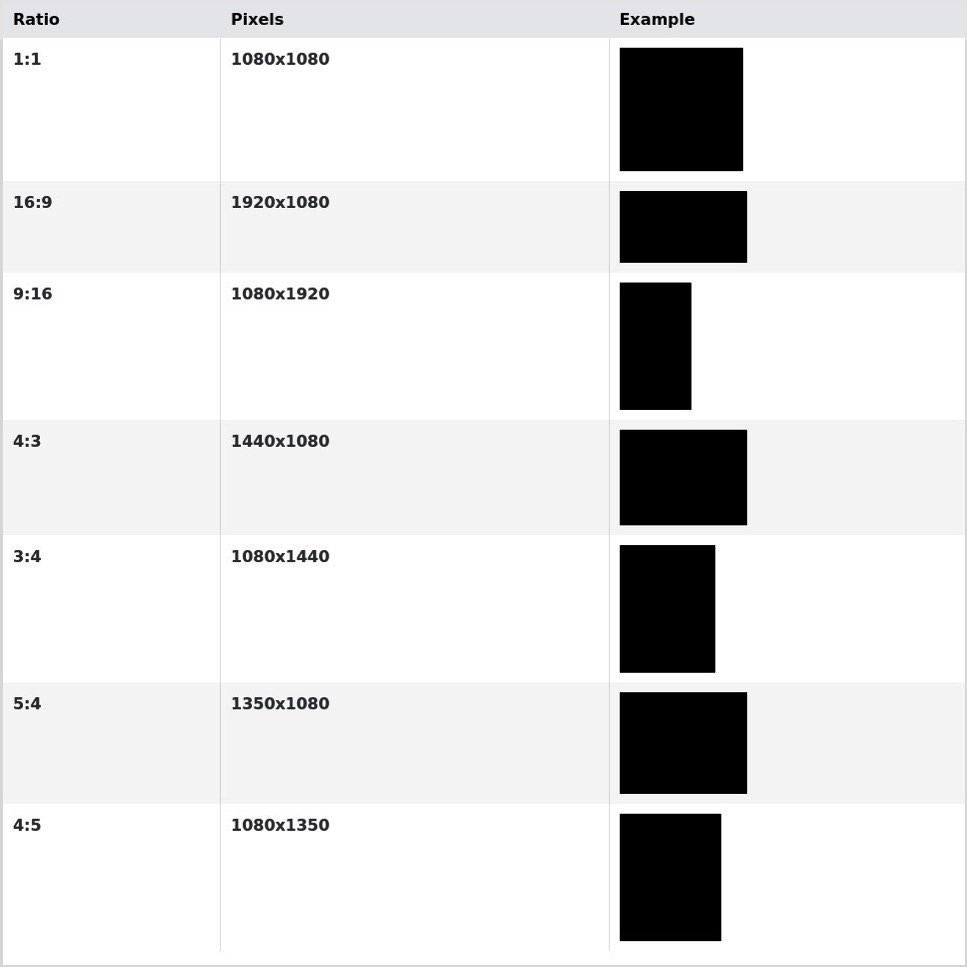
Resolution refers to the number of pixels that exist inside an image. The first number represents the amount of pixels horizontally while the second number represents vertical. On the other hand, an aspect ratio refers to the proportional relationship between an image's width and height.
Editing in higher resolutions will require a powerful cpu, a good amount of RAM, and plenty of storage. It’s also worth noting that the majority of social apps such as TikTok don’t support 4k and will compress your video. 1080p is more than sufficient for casual work. Creators online will sometimes write “4k” in their description when it actually isn’t to gain views. Don’t fall for this band wagon.
FPS Settings
The most common FPS in video editing. FPS represents the amount of frames per second.
30FPS: Standard fps & can be used for most comps. Editing pictures, animations, sports etc.60FPS: Best when editing video games or making an edit that revolves around time interpolation.23.976FPS: Best for cinema, real life footage and AMV’s. Most TV shows are shot in this fps, and editing in the same fps as your original footage looks so much better.15FPS: Used for an intentional “laggy” look, you can also experiment with any nearby numbers.
Want to edit in a fps lower than 30fps?
Instead of adjusting your FPS in comp settings, consider using posterize time (an effect in After Effects) to avoid potential playback glitches. By using this effect you’ll also have the ability to lower the frame rate of specific layers rather than having your whole project affected, plus, you can set keyframes.
Start & Duration
There are little situations where you’d need to change the start number, you should leave it at 0.
Set your duration to the length you want your edit to be. If you plan to edit to an audio that is 30 seconds long, you’d enter 0:00:30:00, additionally, your workspace will end at 30s.
If you were to import a video which is longer than your set duration, you won’t be able to preview all of it as it’ll be blocked off. You can always adjust your comp settings and workspace at any time by going to composition > composition settings.
Other Settings
For a stronger motion blur, you can go into the “advanced” tab and increase your shutter angle and samples per frame. Intense motion blur is not recommended while also using blur based plugins.
Your background color represents the color that will be visible when no other media is on the timeline. If you plan to do fades or flashes, you’ll normally want to set this color to black.
Make sure to name your comps something recognizable, otherwise you may end up overwhelmed. Give each of your edits a name unique to them!
How to save and import presets
Presets allow users to save any adjustments they’ve made into a tiny file. Presets can help you save time by allowing you to easily recreate transitions or effects in just one click, all you have to do is import and apply. Editors will often share presets with one another, whether this be between friends, through free online resources, or purchased content.
FFX presets
FFX presets, unique to After Effects, are the most common type of preset you’ll find yourself working with.
To save a preset, highlight what you’d like to be saved, such as any keyframes or effect controls by clicking and dragging your cursor over them or holding shift. Next, click “animation” at the top and select “save animation preset”. Name your preset whatever you’d like to remember it by. Presets should be saved in:
Windows: \Documents\Adobe\After Effects 2024\User Presets
Mac: ~/Documents/Adobe/After Effects 2024/User Presets
For better organization, users can create sub-folders in User Presets.
For example, one folder for colorings and another for shakes. You can organize and name your folders however you’d like, and as long as they’re located under “User Presets”, they will be visible. You’ll be able to drop down these folders, ultimately resulting in a clean list inside After Effects.
Incorrect guides online may use:
Windows: C:\Program Files\Adobe\Adobe After Effects 2024\Support Files\Presets
Mac: /Applications/Adobe After Effects 2024/Presets
While this location may function, it is not recommended as it is reserved for default presets. If used, your personal presets will appear next to default, rather than their own category which is not ideal.
MBLook + RGX presets
MBLook and RGX presets are unique to Magic Bullet looks, a plugin used to create colorings. While some editors may choose to save all their MBL settings as .ffx, others may prefer .mblook or .rgx, as you can easily preview them inside the Looks Builder.
To save a custom preset inside Looks on any version, simply click the downwards arrow on the bottom left of your screen after you’ve finished your coloring.
How you import presets depends on your Magic Bullet Looks version, as Red Giant switched their extension from MBLook to RGX in version 14 and higher.
Version 13-
To import .mblook files on MBL 13 or before, simply paste them (as a folder) in the following location:
Windows: C:\Program Files (x86)\LooksBuilder\Looks
MacOS: /Library/Application Support/LooksBuilder/Looks/
Older versions of MBL (13-) do not support .rgx files, Users will not be able to use these types of presets unless they upgrade, which is recommended as Magic Bullet 14 is 5 years old.
Version 14+
To import .rgx files on MBL 14 or newer, simply paste them (as a folder) in the following location:
Documents\Red Giant\Magic Bullet Looks\Presets
To import .mblook files, you’ll have to directly import them inside of Looks Builder, which will automatically convert them to .rgx for you. To do this, select the folder you want them to save to, click the arrow symbol on the top left, then select the files you wish to import.
The latest version of Magic Bullet can be found on our website.
After Effects Shortcuts
The Mac equivalent of Ctrl is Cmd.
Spacebar = play/pause your preview
0 Numpad = RAM preview
I = go to first frame of the selected layer
O = go to last frame of the selected layer
B = set the beginning of your workspace
N = set the end of your workspace
(Your workspace is the area that plays when previewing)
Ctrl + Shift + D = split your layer
Alt/option + [ = trims your layer (beginning)
Alt/option + ] = trims your layer (end)
Ctrl + A = Selects all layers in your composition
Ctrl + shift + C = precompose
Ctrl + Z = undo your last action
Ctrl+ Shift + D = Redo last action undone
V = Select
H = Hand
S = Scale
T = Opacity
R = Rotation
P = Position
G = Pen Tool
Y / A = Anchor Point
U = View all Keyframe(s)
L = Audio Level(s)
M = View Mask(s)
L 2x = View Waveform(s)
Alt + Shift + S = Creates Scale Keyframe
Alt + Shift + T = Creates Opacity Keyframe
Alt + Shift + R = Creates Rotation Keyframe
Alt + Shift + P = Creates Position Keyframe
Ctrl + C = Copy
Ctrl + V = Paste
(You can copy and paste keyframes, effect settings, layers and more.)
Ctrl + S = Save
Ctrl + I = Import
Ctrl + O = Open
Ctrl + Y = New Solid
Ctrl + D = Duplicate Layer
Ctrl + T = New Text Layer
Ctrl + Alt + T = Enable Time Remap
Ctrl + K = Composition Settings
F9 / FN + F9 = Easy Ease Keyframes
F3 / FN + F3 = View Effects Panel
F4 / FN + F4 = Show/Hide Layer Switches & Modes columns
Ctrl + Alt + M = Adobe Media Encoder
Ctrl + Alt + N = New Project
Ctrl + Alt + Y = New Adjustment Layer
Ctrl + Alt + Shift + Y = New Null Layer
Ctrl + Alt + Home = Center Anchor Point
Ctrl + Down Arrow = Select Next Layer in Stacking Order
Ctrl + Up Arrow = Select Previous Layer in Stacking Order